Stand Out codes/Guides
Stand Out Stats Guide
Updated Source Official Stand Out Trello
Every level in Stand Out gives 3 stat points for Health, Damage or Ability, and accessories add more on top. The short answer: put points into Ability only if your Stand is on the Ability list below; otherwise Damage and Health do more. The best gear comes from the world bosses Jotaro and DIO. All numbers are from the developers’ official Trello.
How stats work
- Health raises your HP.
- Damage raises the damage of your attacks.
- Ability raises your Stand’s special effects: longer durations, more projectiles, bigger areas. With 100 Ability, Time Stop lasts twice as long.
- 3 points per level. The max level is 75 on the Trello’s Stats card (updated Nov 14); an older card says 50.
- Reset Stats in the stats menu costs 1,000 Dalas.
- Accessory bonuses show next to each stat in green (for example +25 Ability).
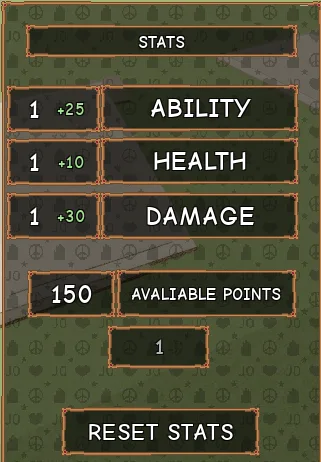
Which stat should you level?
This is our reading of the developers’ numbers, not an official build:
- Your Stand is in the Ability table below: Ability changes how its moves work (Magician’s Red’s Crossfire Hurricane reaches up to 50% further, Glory Days gets one more bullet per 30 points). Split points between Ability and Health.
- Time Stop users (The World, Star Platinum and their evolutions): Ability lengthens Time Stop, doubling it at 100.
- Everyone else: Damage for kill speed, Health so you survive PvP and raids.
- You can always reset for 1,000 Dalas, so testing a build is cheap once you have some money.
What Ability does for each Stand
The 22 Stands the developers list with Ability scaling. See each one’s full moves on the Stand Out Stands list.
| Stand | What more Ability does |
|---|---|
| 200 Balloons | Inflate's Slam variant creates 1 more balloon per 30 invested ability points, up to 5 extra. Total Balloons' EX meter drain is reduced by up to 1/3rd with ability investment |
| Beyond The Sea | Jellyfish Summon and Humu Summon lifespan scales |
| Cat Size | Ankle Snare's lifetime and trap duration scale with ability, up to 50% longer. |
| Catch The Rainbow | Motionless Rain creates 1 additional drop per arm for every 50 ability points invested. |
| Emperor | Hol Horse Philosophy time limit and Blind Shot bullet lifespan scale with ability, up to 50% longer. Emperor Pulemet's movement penalty scales with ability, removing up to 35% of the movement penalty. |
| Glory Days | Mag size scales with ability, increasing by 1 for every 30 points. |
| Harvest | Search Party's scouting interval scales and maximum finds scale with ability, up to 50% faster intervals and +3 max finds. All harvest poison damage scales with ability, dealing up to 50% more per tick. |
| Heaven’s Door | Written Command's special effects from "Forget Motion" "Forget Me" and "Lower Your Guard" have their duration scale with ability, up to 50% longer. Safety Lock scales with ability, preventing up to 3 additional attacks. |
| Hermit Purple | Hermit's Sling search and travel range scales with ability, up to 50% further. |
| John Rod | Blind the Heavens' charge speed scales with ability, charging up to 33% faster |
| Magician’s Red | Crossfire Hurricane's projectile range scales with ability, up to 50% further. With Life Detector, the homing detection range, homing duration, and homing turn speed scale with ability, up to 50% longer/faster. Life Detector's radius and lifespan scales with ability, up to 50% larger radius/longer lifespan. |
| Rolling Stones | Super Glue's healing and duration scale with ability, up to 50%. Rolling Stones begins moving sooner scaling with ability, up to 33% sooner. Rolling Stones' "Within Death's Reach" triggers earlier scaling with ability, from 10 seconds to a max of 15 seconds. |
| Smoke On The Water | Boil duration and Pressure Cooker duration scales off ability, up to 50% longer. Puddle size from Super Soaker and Hot Potato scales off ability, up to 50% wider/deeper puddles. Heat self damage scales off ability, up to 1/3rd less self damage. |
| Smooth Operators | All special effects from the EX moves have their duration scale with ability, up to 50% longer. |
| Super Fly | Damage Redirection's max damage stored scales with ability, from 120 up to a max of 180. |
| The Grateful Dead | Withering Mist range and aging stacks per tick scales with ability, up to 50% larger range and stacks applied per tick. Senior Citizen EX meter gain and age stacks scale off ability, up to 50% more meter gain and 33% less aging stacks. Ice Pack duration and unclaimed ice lifespan scale off ability, up to 50% longer. |
| The Sun | The Sun's model size scales with ability, capped at twice its normal size. |
| Tower of Gray | Acid Spit fires an additional glob per 30 points in ability, up to 5 extra. |
| Tubular Bells | Inflate Balloons' balloon slots increase by 1 per 30 points in ability. Pick Up Scent duration, Balloon Flower duration, and Balloon Parade duration scale off ability, up to 50% |
| Under World | Burrow and Unearth's Warrior lifespan scale with ability, up to 50% longer. Unearth and Prop Memory's wind ups shorten by up to 1/3rd. Every 30 ability points invested adds an additional Tora side bomb to Tora! Tora! Tora! |
| Walking Heart | Highest Heels duration scales with ability, from 10 seconds up to a max of 15 seconds. Heel length and other moves remain their fixed values. |
| West End Girl | Money Case lifespan and Gap Traverse range scale with ability, up to 50% longer. |
Best accessory sets
Wearing both pieces of a set adds a bonus. Stats shown as Ability / Damage / Health for both pieces together.
| Set | Where from | Ability / Damage / Health | Set bonus |
|---|---|---|---|
| Jotaro’s Jacket + Pants | Jotaro (world boss, day) | +10 / +30 / +10 | +15 Ability, 10% more Rage Finish damage |
| DIO’s Jacket + Pants | DIO (world boss, night) | +30 / +15 / +10 | +20 Ability |
| Enrico’s Jacket + Pants | Not listed | +12 / +20 / +13 | +15% walk speed |
| Ningbo’s Jacket + Pants | Bounties | +2 / +9 / +6 | +15% fire resistance |
| SWAT Jacket + Pants | Bounties | +0 / +4 / +10 | +5% damage resistance |
| D’Arby’s Jacket + Pants | D’Arby’s Rematch bounty | +5 / +3 / +6 | +10% money earned |
| Shigechi’s Jacket + Pants | Bounties | — | +10% money earned |
Jotaro and DIO are world bosses; their drops scale with your damage. See Stand Out bosses for when they spawn.
Every accessory with a bonus
Sorted by total bonus. A few newer items list Strength instead of Damage, as written on the Trello.
| Accessory | Ability | Damage | Health | Strength | Other | Where from |
|---|---|---|---|---|---|---|
| DIO’s Jacket | +15 | +10 | +5 | — | If equipped with DIO's Pants you get +20 Ability | DIO (world boss) |
| DIO’s Pants | +15 | +5 | +5 | — | If equipped with DIO's Jacket you get +20 Ability | DIO (world boss) |
| Jotaro’s Jacket | +5 | +15 | +5 | — | If equipped with Jotaro's Pants you get +15 Ability and 10% more Rage Finish damage | Jotaro (world boss) |
| Jotaro’s Pants | +5 | +15 | +5 | — | If equipped with Jotaro's Jacket you get +15 Ability and 10% more Rage Finish damage | Jotaro (world boss) |
| Enrico’s Jacket | +6 | +10 | +7 | — | If equipped with Enrico's Pants you get +15% Walkspeed | Not listed |
| Enrico’s Pants | +6 | +10 | +6 | — | If equipped with Enrico's Jacket you get +15% Walkspeed | Not listed |
| Pesci’s Jacket | +6 | +8 | +8 | — | +5% Water Stand Damage | Train Raid, Train shop (25 tokens) |
| Coat of a Dedicated Bodyguard | — | — | +5 | +10 | +5% Guard | Yo-Yo quest (Exclusive to the fifth clear) |
| This Coat is on Fire | — | — | +5 | +10 | +10% Fire Resistance | Clean Business (Sketchy Man) |
| Hand Of Fate | +3 | — | +3 | +7 | Fate’s Spared (Rolling Stones picks you half as often.); Crimson Hunter (For 10 seconds after a King Crimson Full user uses Time Skip, Time Erase or Epitaph, you deal them more damage by 20%); more | The Statue of Sorrow (if you lure Rolling Stones) |
| Slave Of Fate | +5 | — | +5 | +3 | Fate’s Chosen (Rolling Stones is more likely to choose you as its target, and is faster while following you.); Crimson’s Mark (takes more damage from King Crimson (Full) after its time moves) | The Statue of Sorrow (if Rolling Stones catches you) |
| Howler’s Jacket | +3 | +3 | +5 | — | — | Howler Crates |
| Jodio’s Jacket | +3 | — | +7 | — | — | Bounties |
| Ningbo’s Jacket | +1 | +6 | +3 | — | If equipped with Ningbo's Pants you get +15% Fire resistance | Bounties |
| Paco’s Jacket | — | +4 | +6 | — | — | Bounties |
| Dragona’s Jacket | +2 | +3 | +4 | — | — | Bounties |
| Howler’s Pants | +2 | +3 | +4 | — | — | Howler Crates |
| Key West’s Jacket | +3 | +2 | +4 | — | — | Bounties |
| Key West’s Pants | +2 | +4 | +3 | — | — | Bounties |
| Laem Chabang’s Jacket | +4 | +1 | +4 | — | — | Ocean Crates and Sand Metal Detecting |
| Rohan’s Jacket | +5 | +2 | +2 | — | — | Bounties |
| Trader’s Sticky Hat | +6 | — | — | +3 | Crouch Speed +10%; Search Party luck +20% (Harvest); Yo-Yo Ma’s favorite (Yo-Yo Ma's decoy props now look more real, and it can spit craft mysterious arrows/rokas 5 minutes earlier than the usual timer.) | Yo-Yo quest (Exclusive to the first clear) |
| Blackmore’s Jacket | +2 | +2 | +4 | — | — | Catch The Rainbow (Blackmore) |
| Charming Man’s Pants | +2 | +2 | +4 | — | — | Bounties |
| Jodio’s Pants | +2 | — | +6 | — | — | Bounties |
| Paco’s Pants | +1 | +4 | +3 | — | — | Bounties |
| D’Arby’s Jacket | +3 | +2 | +3 | — | If equipped with D'Arby's Pants you get +10% Money earned. | D'Arby's Rematch |
| Charming Man’s Jacket | +2 | +2 | +3 | — | — | Bounties |
| Ningbo’s Pants | +1 | +3 | +3 | — | If equipped with Ningbo's Jacket you get +15% Fire resistance | Not listed |
| SWAT Jacket | — | +2 | +5 | — | If equipped with SWAT Pants you get +5% Damage Resistance | Bounties |
| SWAT Pants | — | +2 | +5 | — | If equipped with SWAT Jacket you get +5% Damage Resistance | Bounties |
| Hawaii Warrior’s Jacket | +1 | +4 | +1 | — | — | Bubble Practice |
| Jodio’s Earrings | +3 | — | +3 | — | — | Bounties |
| Laem Chabang’s Holster | +6 | — | — | — | +5% Bullet Damage | Ocean Crates and Sand Metal Detecting |
| Laem Chabang’s Pants | +2 | +2 | +2 | — | — | Ocean Crates and Sand Metal Detecting |
| Ningbo’s Hat | — | +1 | +5 | — | +5% Fire Resistance | Bounties |
| SWAT Backpack | — | — | +6 | — | — | Bounties |
| Usagi’s Pants | +4 | +2 | — | — | — | Bounties |
| D’Arby’s Pants | +2 | +1 | +3 | — | If equipped with D'Arby's Jacket you get +10% Money earned. | D'Arby's Rematch |
| Dragona’s Pants | +1 | +2 | +2 | — | — | Bounties |
| Rohan’s Pants | +3 | +1 | +1 | — | — | Bounties |
| Usagi’s Backpack | +3 | — | +2 | — | — | Bounties |
| Blackmore’s Pants | +1 | +2 | +1 | — | — | Catch The Rainbow (Blackmore) |
| Bobby Jean’s Hat | +2 | +2 | — | — | +5% Bullet Damage | Bounties |
| Meryl Mei Qi’s Pants | — | +3 | +1 | — | — | Bounties |
| Meryl Mei Qi’s Shoulder Bows | — | — | +4 | — | — | Crash Course |
| Tarkus’s Helmet | — | — | +3 | +1 | -10% Walk Speed; +20% Damage Resistance | 77 Rings Raid |
| Meryl Mei Qi’s Jacket | — | +1 | +2 | — | — | Bounties |
| Meryl Mei Qi’s Necklace | +3 | — | — | — | — | Crash Course |
| Ripple Training Mask | +3 | — | — | — | — | Lisa Lisa (bought) |
| Shigechi’s Jacket | — | — | — | — | If equipped with Shigechi's Pants you get +10% Money earned. | Bounties |
| Shigechi’s Pants | — | — | — | — | If equipped with Shigechi's Jacket you get +10% Money earned. | Bounties |
| Cloak | — | — | — | — | When worn by a Vampire, daylight can’t burn them. | 77 Rings Raid |
| Treasure of the Lettuce Dealer | -6 | — | -5 | -15 | +15% Crop sale price; +2% Delivery pay per gardening level; +5% Seed discount; Marked (Makes you appear more often on eliminations); Stubborn straps (can’t be unequipped until you finish 3 garden deliveries) | Yo-Yo quest (Exclusive to the tenth clear) |
More Stand Out guides
- Stand Out codesEvery working code and what it gives
- Stand Out tier listEvery Stand ranked S to C, with rarity and how to get the best ones.
- Stand Out beginner guideYour first hour, arrow odds, fast EXP, money quests, NPCs, Hamon and raids.
- Stand Out arrowsOfficial Lucky and Bizarre Arrow odds, the Stand pool and free arrow sources.
- Stand Out StandsEvery Stand with rarity, part, tier, how to get it and its moves.
- Stand Out bossesDIO and Jotaro spawns and drops, the three raids step by step, raid shop prices.
- Stand Out NPC locationsWhere every NPC is, the weather-only ones, and every side quest reward.
- Stand Out updateThe latest patch notes in plain words, and every update since September.
- Stand Out HamonHamon Training, the three paths, becoming a Vampire and every move.
- Stand Out RokakakaGrowing, the 3% mutation, Opal Roka evolutions and 2x boosters.
- Stand Out controlsPC keybinds, EX and pilot keys, vehicles, Stand-specific keys and mobile settings.
- Stand Out TrelloThe official Trello and Discord links, and which Trello board is current.
FAQ
What are the best stats in Stand Out?
There are three: Health, Damage and Ability. Ability only matters if your Stand’s moves scale with it (the developers list which ones do), so Stands like Magician’s Red, Harvest or Glory Days get more from Ability, while others lean on Damage and Health.
How do I reset my stats in Stand Out?
Use Reset Stats in the stats menu. It costs 1,000 Dalas, per the in-game screenshot on the official Trello.
How many stat points do I get?
3 per level. The Trello’s Stats card gives the max level as 75 (an older card says 50).
What is the best accessory for stats?
Jotaro’s and DIO’s sets from the world bosses give the most. Jotaro’s jacket and pants give +10 Ability, +30 Damage and +10 Health plus +15 Ability as a set; DIO’s give +30 Ability, +15 Damage and +10 Health plus +20 Ability as a set.
Sources
- Official Stand Out Trello — stats and levels, the stats menu screenshot, every accessory’s bonuses and source, and each Stand’s Ability scaling
- STAND OUT on Roblox — the game and its developer